---
title: Creating a Contact List
description: Create and manage contact lists to send communications to selected member groups. Lists must be updated manually and cannot be renamed.
---
[Skip to content](https://knowledge.keyvision.com.au/creating-a-contact-list#main-content)
English - Australia
Show submenu for translations

Open main navigation
Close main navigation
- English - Australia
Show submenu for translations
- Contact us
Contact us
How can we help you?
- There are no suggestions because the search field is empty.
1. [Keyvision](https://knowledge.keyvision.com.au/?hsLang=en-au)
2. [Member Management](https://knowledge.keyvision.com.au/member-management?hsLang=en-au)
3. [Member Registrations](https://knowledge.keyvision.com.au/member-management?hsLang=en-au#member-registrations)
8 July 2026
# Creating a Contact List
## Contact lists work like mailing lists, letting you quickly send communications to groups.
#### **To create a list:**
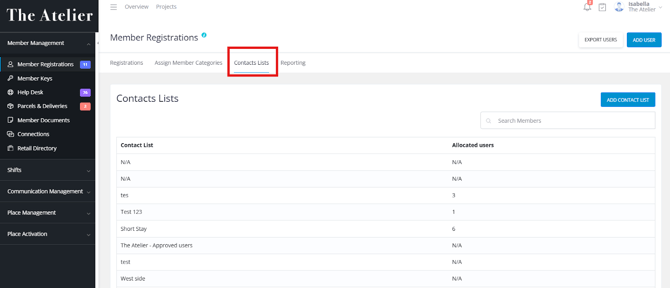
1\. Go to **Member Management \> Member Registration \> Contact Lists**.
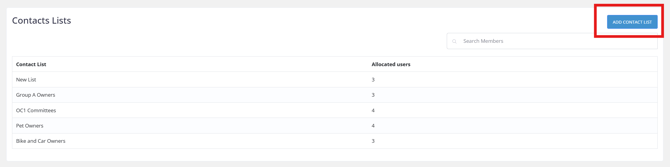
2\. Click **Add Contact List** and name it.
3\. Choose recipients by:
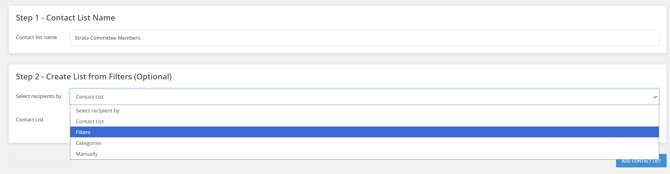
- Using an existing contact list.
- Filtering by account type (by User Role and/or User Status).
- Assigning categories.
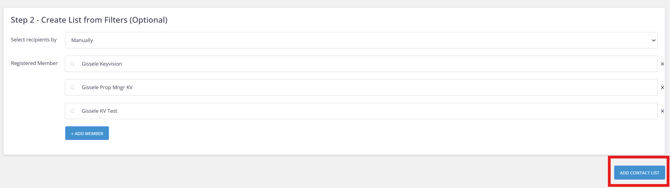
- Manually selecting members.
4\. Click **Add Contact List** to save.
#### **Managing a list:**
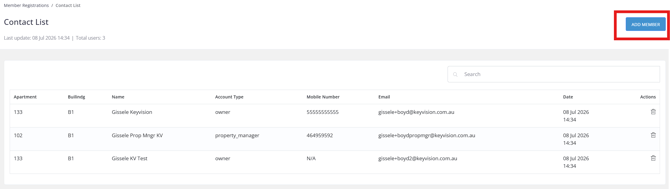
- To add members, open the list and click **Add Member**.
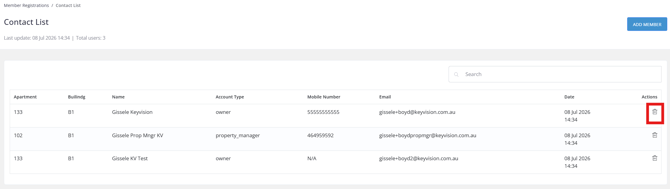
- To remove, click the **bin icon**.
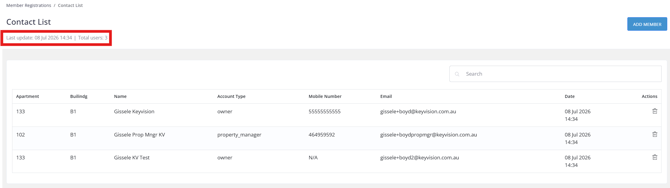
- Each list shows the total members and last update date.
⚠️ **Important notes:**
- Contact lists must be updated manually. Avoid creating lists that change frequently (e.g., “Approved Members”).
- Lists cannot be renamed or deleted, as this could break records linked to past communications.
After creating a contact list, you can use it when composing an email.
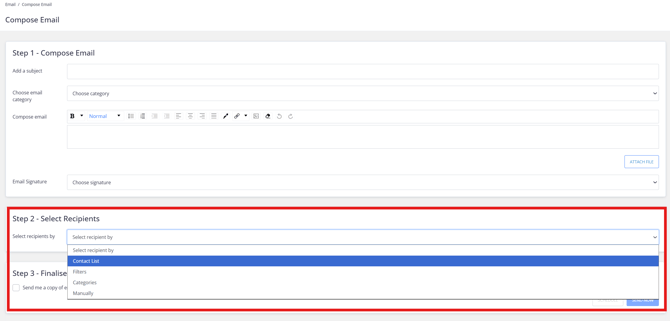
In **Step 2 - Select Recipients**, open the **Select recipient by** dropdown and choose **Contact List**. You can then select the relevant contact list as your email recipients.
**Recommended uses:**
- Committee groups (e.g., Owners’ Corporation members)
- Residents who completed gym inductions
- Owners by level or property type
- Management teams
- [Communication Management](https://knowledge.keyvision.com.au/communication-management?hsLang=en-au#main-content)
- [Categories](https://knowledge.keyvision.com.au/communication-management?hsLang=en-au#categories)
- [Emails](https://knowledge.keyvision.com.au/communication-management?hsLang=en-au#emails)
- [Newsfeed](https://knowledge.keyvision.com.au/communication-management?hsLang=en-au#newsfeed)
- [Online Forms](https://knowledge.keyvision.com.au/communication-management?hsLang=en-au#online-forms)
- [Member Management](https://knowledge.keyvision.com.au/member-management?hsLang=en-au#main-content)
- [Help Desk](https://knowledge.keyvision.com.au/member-management?hsLang=en-au#help-desk)
- [Member Registrations](https://knowledge.keyvision.com.au/member-management?hsLang=en-au#member-registrations)
- [Parcels & Deliveries](https://knowledge.keyvision.com.au/member-management?hsLang=en-au#parcels-deliveries)
- [Place Management](https://knowledge.keyvision.com.au/place-management?hsLang=en-au#main-content)
- [Building Keys](https://knowledge.keyvision.com.au/place-management?hsLang=en-au#building-keys)
- [Contractors](https://knowledge.keyvision.com.au/place-management?hsLang=en-au#contractors)
- [Keys & Fobs](https://knowledge.keyvision.com.au/place-management?hsLang=en-au#keys-fobs)
- [Work Orders](https://knowledge.keyvision.com.au/place-management?hsLang=en-au#work-orders)
- [Place Activation](https://knowledge.keyvision.com.au/place-activation?hsLang=en-au#main-content)
- [Event Calendar](https://knowledge.keyvision.com.au/place-activation?hsLang=en-au#event-calendar)
- [Management Access, Settings & Permissions](https://knowledge.keyvision.com.au/management-access-settings-permissions?hsLang=en-au)
- [Release Notes](https://knowledge.keyvision.com.au/release-notes?hsLang=en-au#main-content)
- [2026](https://knowledge.keyvision.com.au/release-notes?hsLang=en-au#2026)
- [Dashboard Access](https://knowledge.keyvision.com.au/dashboard-access?hsLang=en-au)
- [Essentials](https://knowledge.keyvision.com.au/essentials?hsLang=en-au#main-content)
- [How To's](https://knowledge.keyvision.com.au/essentials?hsLang=en-au#how-tos)
[](https://keyvision.com.au/?hsLang=en-au)
[mailto:email@email.com](mailto:email@email.com)
Copyright © 2026, Keyvision